Welcome to the first edition of a (hopefully!) ongoing series of painting tutorials. I often get asked how I paint my models, so I've decided start a semi-regular posts covering the process from beginning to end. Each time, we'll look at a particular army; if popular, I hope to eventually cover all races and armies of Middle Earth. Rather than looking at one step, these tutorials are intended to be more long-form, teaching you how to paint whole troops to a tabletop level, with extra optional steps if you want to push things a bit further! We'll also explore different colours, textures, and techniques.
Without further ado, let's crack on! First up are the doughty warriors of Rohan. With quite a simple colour scheme of muted green and brown tones, there's instead a lot of scope for techniques like weathering to add a bit of visual interest:
Steel armour
1. Undercoat the whole model (I have used Zandri Dust here)
2. Undercoat all steel areas in Leadbelcher
2. Undercoat all steel areas in Leadbelcher
3. Apply Basilicanum Grey contrast paint all over
4. Edge highlight with Stormhost silver; you can also add scratches here
Bronze armour
5. Basecoat all bronze areas with Gehenna's gold
6. Wash with Carroburg crimson
7. Edge highlight with Liberator Gold
8. OPTIONAL: Spot highlights with 50/50 Liberator Gold/Stormhost Silver on the sharpest points
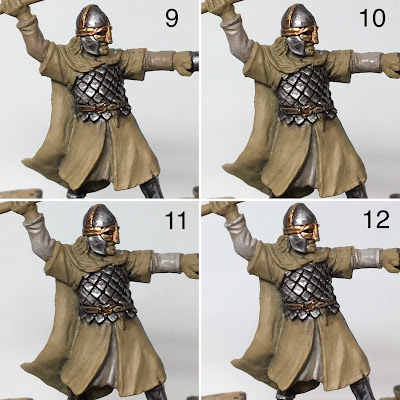
Cream cloth
9. Basecoat Baneblade Brown
10. Layer Rakarth flesh, leaving Baneblade brown only in the deepest recesses
11. Highlight folds 50/50 Rakarth Flesh/Wraithbone
12. Edge highlight with Wraithbone on the highest creases
Brown cloth
13. Basecoat 75/25 Dryad Bark/Baneblade Brown; wash pure Dryad Bark into the deepest folds
14. Highlight 50/50 Dryad Bark/Baneblade brown. To add some texture you can apply this 'roughly', stippling rather than layering the highlight to make the cloth look rough
15. Smaller highlights with 25/75 Dryad Bark/Baneblade Brown, again stippled roughly on
16. OPTIONAL: Highlight the sharpest edges with pure Baneblade Brown, and add scratches across the surface of the cloth
Green cloaks
17. Basecoat Deathworld forest
18. Shade the deepest folds with 50/50 Deathworld Forest/Rhinox Hide
19. Layer 75/25 Deathworld forest/Ushabti bone over the majority of the surface
20. Layer 50/50 Deathworld forest/Ushabti bone, leaving some of the previous layer visible
21. Highlight sharper folds with 25/75 Deathworld forest/Ushabti bone
22 OPTIONAL: Spot highlight pure ushabti bone on the highest points
23. Basecoat Knight-Questor Flesh
24. layer 50/50 Knight-Questor Flesh/Flayed One Flesh
25. Highlight raised areas with Flayed One Flesh
25. Highlight raised areas with Flayed One Flesh
26. OPTIONAL: Dot Ushabti bone on the highest points (knuckles, lips etc)
27. Basecoat Averland Sunset
28. Wash Reikland Fleshshade
29. Highlight strands 50/50 Averland Sunset/Ushbati bone
30. OPTIONAL: Dot pure Ushabti bone onto the highest points
Black leather
31. Basecoat Abaddon Black
32. Edge highlight with Dark Reaeper, leaving Abbaddon black in the centre
33. Smaller edge highlights with Russ Grey
34. OPTIONAL: Dot Celestra Grey onto highest points
Shields
35. Paint green areas using the same approach as the cloak
35. Paint green areas using the same approach as the cloak
36. Basecoat the symbol Baneblade brown
37. Layer the symbol with Rakarth flesh
38. Edge highlight with Pallid Wych Flesh
39. OPTIONAL: Dot Wraithbone onto highest points
40. OPTIONAL: Sponge Rhinox hide onto lower half to simulate mud spatters
And there we have it! How to paint a warrior of Rohan, from beginning to end. As I say, I'd love to hear your feedback - would you prefer smaller, bite size tutorials over several posts? Also, any recommendations for armies you'd like to see next? Let me know in the comments!
Until next time,
Ben


Super in depth guide and above all your style for Rohan warriors is amazing! Great job!!
ReplyDeleteThank you so much; I'm really glad you liked it!
DeleteMuy guapa la guia, espero más tutoriales así van muy bien!
ReplyDelete